hier eine leichte Anleitung für eine Nextcloud Installation auf Ubuntu 24 mit Apache, PHP 8.3, MariaDB und Redis “Optional mit phpMyAdmin” zusätzlich noch Absicherung durch Crowdsec und Fail2Ban
dieses Setup ist mit Ubuntu 24.04 LTS und 8 GB RAM auf einer VM erstellt worden, weniger RAM ist natürlich auch möglich, dafür müssen aber ein paar Anpassungen gemacht werden in den nächsten Einstellungen von Mysql und PHP die sich auf den Speicher beziehen, zum Zeitpunkt von diesem Beitrag ist Nextcloud mit der Version 31.0.6.2 verfügbar gewesen.
die Lokale IP des Server ist 192.168.3.10
als erstes das System Updaten
apt update && apt upgrade
jetzt die benötigten Pakete installieren
apt install apache2 redis mariadb-server mariadb-client apt-transport-https unzip bzip2
apt install php8.3 php8.3-cli php8.3-common php8.3-curl php8.3-gd php8.3-intl php8.3-mbstring php8.3-mysql php8.3-opcache php8.3-readline php8.3-xml php8.3-xsl php8.3-zip php8.3-bz2 libapache2-mod-php8.3 php8.3-imagick php8.3-apcu php8.3-gmp php8.3-bcmath php8.3-redis libmagickcore-6.q16-6-extra
Einstellung für Mysql
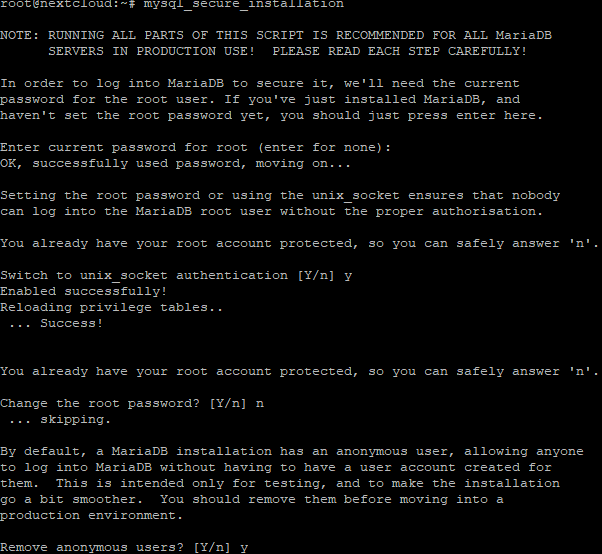
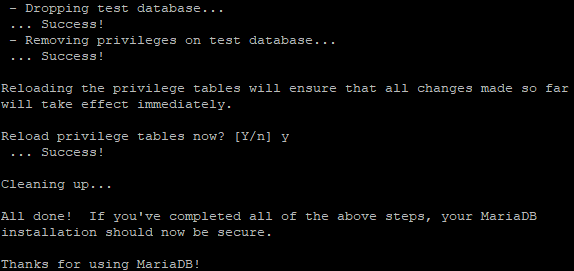
mysql_secure_installation
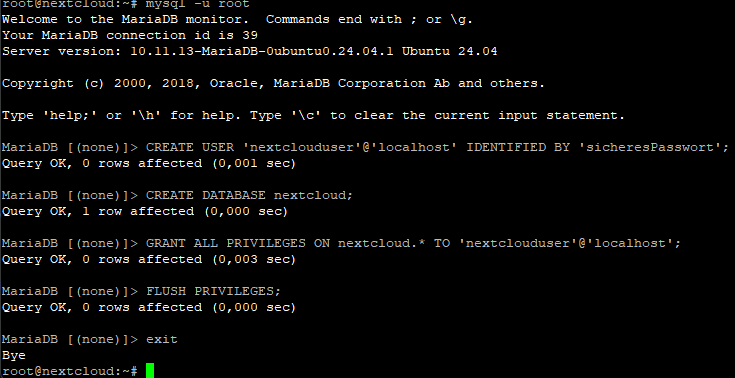
Mysql Benutzer und Datenbank anlegen
mysql -u root
CREATE USER 'nextclouduser'@'localhost' IDENTIFIED BY 'sicheresPasswort';
CREATE DATABASE nextcloud;
GRANT ALL PRIVILEGES ON nextcloud.* TO 'nextclouduser'@'localhost';
FLUSH PRIVILEGES;
nach meiner Erfahrung legt Nextcloud beim installieren schon den richtigen Zeichensatz/Kollation utf8mb4 an, deswegen genügt auch ein einfaches anlegen einer Tabelle, Optional geht das anlegen der Tabelle auch mit dem richtigen Zeichensatz/Kollation
CREATE DATABASE nextcloud CHARACTER SET utf8mb4 COLLATE utf8mb4_general_ci;
Log Verzeichnis anlegen, wurde bei mir zumindest nicht automatisch angelegt
mkdir /var/log/mysql
chown mysql:mysql /var/log/mysql
Datei erstellen /etc/mysql/conf.d/50-server.cnf und bei bedarf an eigene Umgebung anpassen
[mysqld]
innodb_file_per_table=1
innodb_buffer_pool_size=4G         # 60–70% vom freien RAM, evtl. 2G oder 4G bei Bedarf
innodb_flush_method=O_DIRECT
innodb_flush_log_at_trx_commit=2
query_cache_type=0
query_cache_size=0
tmp_table_size=64M
max_heap_table_size=64M
max_connections=200
table_open_cache=2000
thread_cache_size=128
join_buffer_size=1M
sort_buffer_size=2M
read_rnd_buffer_size=512K
log_error=/var/log/mysql/error.log
Datei bearbeiten /etc/mysql/mariadb.conf.d/50-server.cnf
Zeile auskommentieren
#expire_logs_days = 10
systemctl restart mariadb
Einstellung für Redis
Datei bearbeiten /etc/sysctl.conf
Zeile am ende hinzufügen damit es beim reboot auch gesetzt bleibt
vm.overcommit_memory = 1
direkt aktivieren
sysctl vm.overcommit_memory=1
usermod -aG redis www-data
systemctl restart redis
PHP einstellen
Datei bearbeiten /etc/php/8.3/apache2/php.ini bei bedarf an eigene Umgebung anpassen, hier ist ein Datei Upload Limit von 50GB gesetzt,
für die OCC Aufgaben auch in dieser Datei bearbeiten /etc/php/8.3/cli/php.ini
max_execution_time = 3600
max_input_time = 3600
memory_limit = 4G               # 60–70% vom freien RAM, evtl. 2G oder 4G
post_max_size = 51G
upload_max_filesize = 50G
opcache.enable=1
opcache.enable_cli=1
opcache.memory_consumption=1024
opcache.interned_strings_buffer=64
opcache.max_accelerated_files=10000
Datei bearbeiten /etc/php/8.3/mods-available/apcu.ini und
Zeile hinzufügen
apc.enable_cli=1
Nextcloud runterladen und entpacken
cd /var/www/
wget https://download.nextcloud.com/server/releases/latest.tar.bz2
tar xfvj /var/www/latest.tar.bz2
chown -R www-data:www-data /var/www/nextcloud/
Apache Einstellungen
SSL Zertifikat für die Default Verbindung der lokalen Umgebung erstellen
mkdir /etc/apache2/ssl
openssl req -x509 -nodes -days 3650 -newkey rsa:2048 \
  -keyout /etc/apache2/ssl/server.key \
  -out /etc/apache2/ssl/server.crt \
  -subj "/C=DE/ST=Bundesland/L=Ort/O=Firma/CN=nextcloud" \
  -addext "subjectAltName=DNS:nextcloud,IP:192.168.3.10" \
  -addext "basicConstraints=CA:FALSE"
Hostdatei anpassen /etc/hosts
127.0.0.1 localhost
127.0.1.1 nextcloud.local nextcloud
192.168.3.10  nextcloud.local nextcloud
a2enmod ssl
a2enmod rewrite
a2enmod remoteip
a2enmod headers
a2ensite default-ssl
Datei bearbeiten /etc/apache2/sites-available/000-default.conf
je nach dem ob man einen Proxy benutzt die IP Adressen anpassen oder Zeile “RemoteIPTrustedProxy” auskommentieren
<VirtualHost *:80>
	ServerName nextcloud
	ServerAdmin webmaster@localhost
	DocumentRoot /var/www/nextcloud
	<Directory /var/www/nextcloud>
    AllowOverride All
	</Directory>
	RemoteIPHeader X-Forwarded-For
	RemoteIPTrustedProxy 192.168.3.11
	RemoteIPTrustedProxy 192.168.3.12

	# Available loglevels: trace8, ..., trace1, debug, info, notice, warn,
	# error, crit, alert, emerg.
	# It is also possible to configure the loglevel for particular
	# modules, e.g.
	#LogLevel info ssl:warn
	ErrorLog ${APACHE_LOG_DIR}/error.log
	CustomLog ${APACHE_LOG_DIR}/access.log combined
		<IfModule mod_headers.c>
		  Header always set Strict-Transport-Security "max-age=15552000; includeSubDomains"
		</IfModule>
</VirtualHost>
Datei bearbeiten /etc/apache2/sites-available/default-ssl.conf
<IfModule mod_ssl.c>
	<VirtualHost _default_:443>
		ServerName nextcloud
		ServerAdmin webmaster@localhost
		DocumentRoot /var/www/nextcloud
		<Directory /var/www/nextcloud>
		AllowOverride All
		</Directory>
		RemoteIPHeader X-Forwarded-For
		RemoteIPTrustedProxy 192.168.3.11
		RemoteIPTrustedProxy 192.168.3.12

		# Available loglevels: trace8, ..., trace1, debug, info, notice, warn,
		# error, crit, alert, emerg.
		# It is also possible to configure the loglevel for particular
		# modules, e.g.
		#LogLevel info ssl:warn
		ErrorLog ${APACHE_LOG_DIR}/error.log
		CustomLog ${APACHE_LOG_DIR}/access.log combined

		SSLEngine on
		SSLCertificateFile /etc/apache2/ssl/server.crt
		SSLCertificateKeyFile /etc/apache2/ssl/server.key
		<FilesMatch "\.(cgi|shtml|phtml|php)$">
				SSLOptions +StdEnvVars
		</FilesMatch>
		<Directory /usr/lib/cgi-bin>
				SSLOptions +StdEnvVars
		</Directory>
		<IfModule mod_headers.c>
		  Header always set Strict-Transport-Security "max-age=15552000; includeSubDomains"
		</IfModule>
	</VirtualHost>
</IfModule>
jetzt abschließend Apache neustarten
systemctl restart apache2
Nextcloud kann jetzt über die IP vom Ubuntu Server aufgerufen werden, entweder mit http oder https, die Konfiguration abschließen
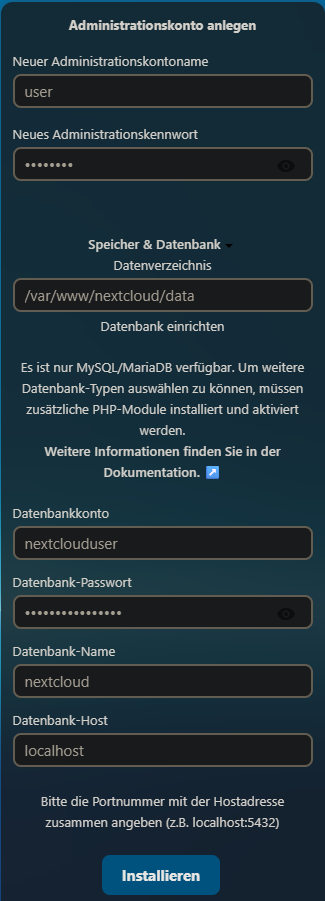

sobald dieser schritt durchgeführt ist muss erst die /var/www/nextcloud/config/config.php angepasst werden
hier die config.php direkt nach der einrichtung
<?php
$CONFIG = array (
  'instanceid' => 'oc2u23zyoki5',
  'passwordsalt' => '/hKltaDfh/RiO5g2tenKJpFZdYtlB0',
  'secret' => 'gmNUMPgk2eP39Mlsq+irVBsokMfWTcSYFBaLGB6k6Oi62FN8',
  'trusted_domains' =>
  array (
    0 => '192.168.3.10',
  ),
  'datadirectory' => '/var/www/nextcloud/data',
  'dbtype' => 'mysql',
  'version' => '31.0.6.2',
  'overwrite.cli.url' => 'https://192.168.3.10',
  'dbname' => 'nextcloud',
  'dbhost' => 'localhost',
  'dbport' => '',
  'dbtableprefix' => 'oc_',
  'mysql.utf8mb4' => true,
  'dbuser' => 'nextclouduser',
  'dbpassword' => 'sicheresPasswort',
  'installed' => true,
);
der erste teil der config darf nicht verändert werden
<?php
$CONFIG = array (
  'instanceid' => 'oc2u23zyoki5',
  'passwordsalt' => '/hKltaDfh/RiO5g2tenKJpFZdYtlB0',
  'secret' => 'gmNUMPgk2eP39Mlsq+irVBsokMfWTcSYFBaLGB6k6Oi62FN8',
diesen teil übernehmen und an eigene Umgebung anpassen
  'trusted_domains' =>
  array (
    0 => '192.168.3.10',
    1 => 'nextcloud.local',
  ),
  'trusted_proxies' =>
  array (
    0 => '191.168.3.11',
    1 => '191.168.3.12',
  ),
  'overwrite.cli.url' => 'http://192.168.3.10',
  'overwriteprotocol' => 'https',
  'forwarded_for_headers' =>
  array (
    0 => 'HTTP_X_FORWARDED',
    1 => 'HTTP_FORWARDED_FOR',
  ),
  'datadirectory' => '/var/www/nextcloud/data',
  'dbtype' => 'mysql',
  'version' => '31.0.6.2',
  'dbname' => 'nextcloud',
  'dbhost' => 'localhost',
  'dbport' => '',
  'dbtableprefix' => 'oc_',
  'mysql.utf8mb4' => true,
  'dbuser' => 'nextclouduser',
  'dbpassword' => 'sicheresPasswort',
  'installed' => true,
  'maintenance' => false,
  'twofactor_enforced' => 'false',
  'theme' => '',
  'loglevel' => 2,
  'maintenance_window_start' => '1',
  'memcache.local' => '\\OC\\Memcache\\APCu',
  'filelocking.enabled' => 'true',
  'memcache.locking' => '\\OC\\Memcache\\Redis',
  'redis' =>
  array (
    'host' => '127.0.0.1',
    'port' => 6379,
    'timeout' => 0.0,
  ),
);
hier noch einmal die gesamte config.php als Beispiel
<?php
$CONFIG = array (
  'instanceid' => 'oc2u23zyoki5',
  'passwordsalt' => '/hKltaDfh/RiO5g2tenKJpFZdYtlB0',
  'secret' => 'gmNUMPgk2eP39Mlsq+irVBsokMfWTcSYFBaLGB6k6Oi62FN8',
  'trusted_domains' =>
  array (
    0 => '192.168.3.10',
    1 => 'nextcloud.local',
  ),
  'trusted_proxies' =>
  array (
    0 => '191.168.3.11',
    1 => '191.168.3.12',
  ),
  'overwrite.cli.url' => 'http://192.168.3.10',
  'overwriteprotocol' => 'https',
  'forwarded_for_headers' =>
  array (
    0 => 'HTTP_X_FORWARDED',
    1 => 'HTTP_FORWARDED_FOR',
  ),
  'datadirectory' => '/var/www/nextcloud/data',
  'dbtype' => 'mysql',
  'version' => '31.0.6.2',
  'dbname' => 'nextcloud',
  'dbhost' => 'localhost',
  'dbport' => '',
  'dbtableprefix' => 'oc_',
  'mysql.utf8mb4' => true,
  'dbuser' => 'nextclouduser',
  'dbpassword' => 'sicheresPasswort',
  'installed' => true,
  'maintenance' => false,
  'twofactor_enforced' => 'false',
  'theme' => '',
  'loglevel' => 2,
  'maintenance_window_start' => '1',
  'memcache.local' => '\\OC\\Memcache\\APCu',
  'filelocking.enabled' => 'true',
  'memcache.locking' => '\\OC\\Memcache\\Redis',
  'redis' =>
  array (
    'host' => '127.0.0.1',
    'port' => 6379,
    'timeout' => 0.0,
  ),
);
übliche Warnungen nach der Einrichtung von Nextcloud in der Übersicht unter Administrationseinstellungen

lassen sich mit diesen befehlen beheben
sudo -u www-data php /var/www/nextcloud/occ maintenance:repair --include-expensive
sudo -u www-data php --define apc.enable_cli=1  /var/www/nextcloud/occ db:add-missing-indices
Automatisches Datenbank Backup Script
das Script Startet den Nextcloud Maintenance Mode, startet das Mysql Backup und deaktiviert wieder den Maintenance Mode, anschließend werden noch alte Log und DB Backup bereinigt, wie viele Backup behalten werden sollen kann mit RETENTION_DAYS eingestellt werden.
Datei anlegen nextcloud-db_backup.sh
#!/bin/bash
# MariaDB-Backup für Nextcloud mit utf8mb4 Unterstützung

### Konfiguration ###
NEXTCLOUD_PATH="/var/www/nextcloud"
BACKUP_DIR="/var/backups/nextcloud"
DB_NAME="nextcloud"
DB_USER="nextclouduser"
DB_PASS='sicheresPasswort'
RETENTION_DAYS=7  # Backups älter als X Tage löschen

DATE=$(date +"%F_%H-%M-%S")
BASE_FILENAME="db_backup_$DATE"
DB_BACKUP_FILE="$BACKUP_DIR/$BASE_FILENAME.sql.gz"
LOGFILE="$BACKUP_DIR/$BASE_FILENAME.log"

### Logging-Funktion ###
log() {
    echo "[$(date '+%F %T')] $1" | tee -a "$LOGFILE"
}

mkdir -p "$BACKUP_DIR"

log "### Backup gestartet ###"

### Maintenance Mode aktivieren ###
log "Setze Nextcloud in den Maintenance Mode..."
if sudo -u www-data php "$NEXTCLOUD_PATH/occ" maintenance:mode --on >> "$LOGFILE" 2>&1; then
    log "Maintenance Mode aktiviert."
else
    log "⚠️ Fehler beim Aktivieren des Maintenance Mode."
fi

### Datenbank-Backup ###
log "Starte Datenbank-Backup..."
if mysqldump --single-transaction --default-character-set=utf8mb4 -u "$DB_USER" -p"$DB_PASS" "$DB_NAME" | gzip > "$DB_BACKUP_FILE"; then
    log "✅ Datenbank-Backup erfolgreich: $DB_BACKUP_FILE"
else
    log "❌ Fehler beim Datenbank-Backup!"
fi

### Maintenance Mode deaktivieren ###
log "Deaktiviere Maintenance Mode..."
if sudo -u www-data php "$NEXTCLOUD_PATH/occ" maintenance:mode --off >> "$LOGFILE" 2>&1; then
    log "Maintenance Mode deaktiviert."
else
    log "⚠️ Fehler beim Deaktivieren des Maintenance Mode."
fi

### Alte Backups + Logs löschen ###
log "Bereinige Backups älter als $RETENTION_DAYS Tage..."
find "$BACKUP_DIR" -type f \( -name "db_backup_*.sql.gz" -o -name "db_backup_*.log" \) -mtime +$RETENTION_DAYS -exec rm -v {} \; >> "$LOGFILE"

log "### Backup abgeschlossen ###"
Cronjob 3 Uhr Nachts
0 3 * * * root /root/nextcloud-db_backup.sh > /dev/null 2>&1
wer seine Nexcloud aus dem Internet erreichbar machen möchte , sollte den Server z.b. mit Crowdsec oder fail2ban absichern, zur generellen Konfiguration gehe ich jetzt aber nicht weiter drauf ein, hier nur der Teil der für Nextcloud relevant ist für die Absicherung durch Crowdsec
entweder über den wizard die collections installieren
/usr/share/crowdsec/wizard.sh -c
oder Manuel
cscli collections install crowdsecurity/nextcloud
anschließend noch die Datei bearbeiten /etc/crowdsec/acquis.yaml und
am ende einfügen und Crowdsec neustarten
filenames:
  - /var/www/nextcloud/data/nextcloud.log
labels:
  type: Nextcloud
---
wer das Daten Verzeichnis auf einem Netzlaufwerk hat bekommt so eine Meldung
level=warning msg="Disabling inotify polling on /var/www/nfs-data/nextcloud.log as it is on a network share. You can manually set poll_without_inotify to true to make this message disappear, or to false to enforce inotify poll" file=/var/www/nfs-data/nextcloud.log type=file
das kann behoben werden in dem man poll_without_inotify: true einfügt
filenames:
  - /var/www/nfs-data/nextcloud.log
poll_without_inotify: true
labels:
  type: Nextcloud
---
anschließend Crowdsec neustarten!
Optional phpMyAdmin
wer gerne mit einer GUI seine Datenbank importieren oder Exportieren möchte, hier eine kurze Anleitung für phpMyAdmin
Mysql Benutzer anlegen und admin rechte geben
mysql -u root
CREATE USER 'mysqlbenutzer'@'localhost' IDENTIFIED BY 'sicheresPasswort';
GRANT ALL PRIVILEGES ON *. * TO 'mysqlbenutzer'@'localhost' WITH GRANT OPTION;
cd /usr/share
wget https://www.phpmyadmin.net/downloads/phpMyAdmin-latest-all-languages.zip -O phpmyadmin.zip
unzip phpmyadmin.zip
rm phpmyadmin.zip
mv phpMyAdmin-*-all-languages phpmyadmin
chmod -R 0755 phpmyadmin
mkdir /usr/share/phpmyadmin/tmp/
chown -R www-data:www-data /usr/share/phpmyadmin/tmp/
Schlüssel für sichere Cookies erstellen
tr -dc 'A-Za-z0-9!@#$%^&*()-_=+{}[]' </dev/urandom | head -c 32
Default config kopieren und diese Datei bearbeiten /usr/share/phpmyadmin/config.inc.php
und den zuvor erstellen Schlüssel dort eintragen
cp /usr/share/phpmyadmin/config.sample.inc.php /usr/share/phpmyadmin/config.inc.php
in dieser Zeile den Schlüssel eintragen
$cfg['blowfish_secret'] = 'dein-erstellter-schlüssel'; /* YOU MUST FILL IN THIS FOR COOKIE AUTH! */
Datei erstellen oder bearbeiten /etc/apache2/conf-available/phpmyadmin.conf
# phpMyAdmin Apache configuration

Alias /phpmyadmin /usr/share/phpmyadmin

<Directory /usr/share/phpmyadmin>
    Options SymLinksIfOwnerMatch
    DirectoryIndex index.php
</Directory>

# Disallow web access to directories that don't need it
<Directory /usr/share/phpmyadmin/templates>
    Require all denied
</Directory>
<Directory /usr/share/phpmyadmin/libraries>
    Require all denied
</Directory>
<Directory /usr/share/phpmyadmin/setup/lib>
    Require all denied
</Directory>
jetzt noch phpmyadmin in apache aktivieren und dienst neustarten
a2enconf phpmyadmin
systemctl restart apache2
jetzt kann phpMyAdmin über die IP aufgerufen werden, und mit dem zuvor erstellen Benutzer angemeldet
https://192.168.3.10/phpmyadmin
zusätzlich noch eine Absicherung falls öffentlich zugänglich,
Fail2ban Installieren und die Erkennungen an Crowdsec melden und sperren lassen.
apt install fail2ban
ich habe aktuell Probleme mit der Version 1.0.2-3 aus dem Ubuntu Noble Repository, die ist irgendwie kaputt, funktioniert jedenfalls nicht richtig,
einfach die neuere Version 1.1.0-1 drüber installieren
wget https://launchpad.net/ubuntu/+source/fail2ban/1.1.0-1/+build/28291332/+files/fail2ban_1.1.0-1_all.deb
dpkg -i fail2ban_1.1.0-1_all.deb
Datei anlegen /etc/fail2ban/action.d/crowdsec.conf
[Definition]
actionstart =
actionstop =
actionban = cscli decisions add -i <ip> --reason <name> --duration 4h
actionunban = cscli decisions delete -i <ip>
Datei anlegen /etc/fail2ban/jail.local
[phpmyadmin-syslog]
enabled = true
banaction = crowdsec
maxretry = 2
port = http,https
filter = phpmyadmin-syslog
logpath = /var/log/auth.log
sollte aus irgend einem Grund der Filter fehlen, Datei anlegen /etc/fail2ban/filter.d/phpmyadmin-syslog.conf
# Fail2Ban filter for the phpMyAdmin-syslog
#

[INCLUDES]

before = common.conf

[Definition]

_daemon = phpMyAdmin

failregex = ^%(__prefix_line)suser denied: (?:\S+|.*?) \(mysql-denied\) from <HOST>\s*$

ignoreregex =


# Author: Pavel Mihadyuk
# Regex fixes: Serg G. Brester
jetzt einmal fail2ban neustarten
systemctl restart fail2ban.service